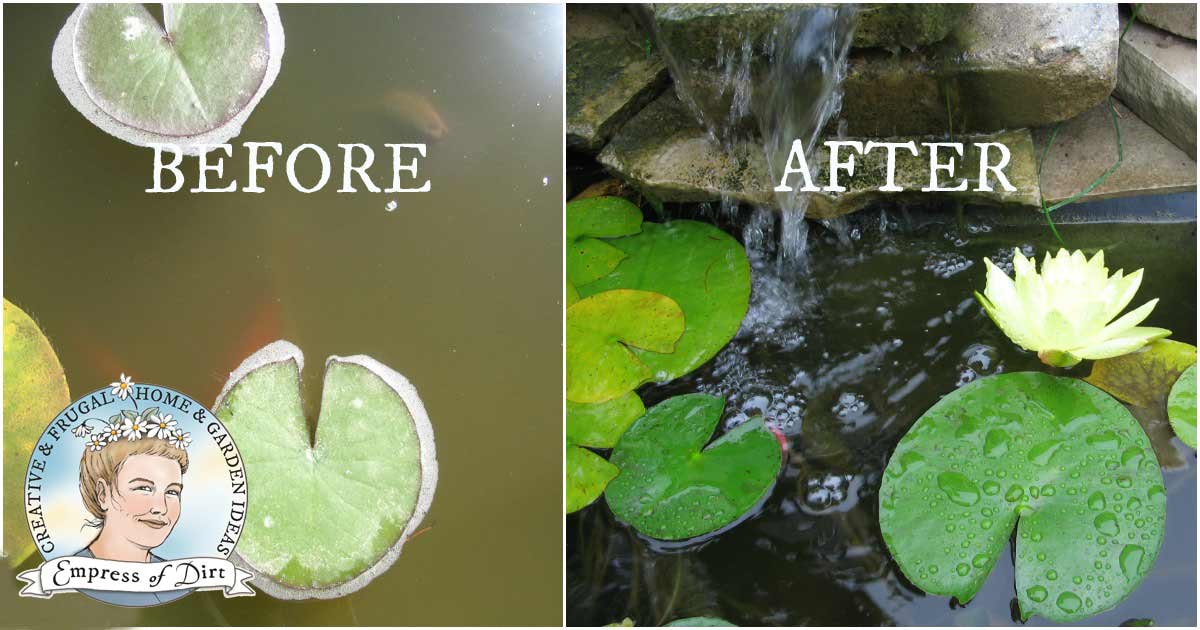
How to Clean Gross Murky Pond Water Fast—without Adding Chemicals
Yes, you can clean your pond water naturally and fast with this Empress of Dirt method—no chemicals needed. It works in fish ponds and most murky water starts to clear within hours.
If you want more tips, also see Advice for Starting a Backyard Pond and our Gallery of Backyard Pond Ideas.

How to Clear Murky Pond Water

Whether it’s slightly green or thick like pea soup, where you can’t see the bottom and only get glimpses of the fish, this quick cleaning method for pond water may work for you.
While, I’ve mostly tested it on ponds smaller than 1000 gallons, it can also work on larger ponds if you have the appropriate strength of recirculating pump and you allow enough time for all of the water to be filtered.
In other words, the larger the pond and the grosser the water, the longer it will probably take. But it can work.
A moderately murky 600-gallon pond will usually become visibly clearer within an hour or two of using this method, and continue to clear after that.
Since originally writing this, I’ve heard from numerous gardeners with very large ponds and they have said it does take longer (up to several weeks for a really big, murky pond) but, if you stick with it, it works. If you’ve tried other methods without success, you may be in luck.
Let’s get started. Be sure to watch the video here to see how it’s done. If you do not want to do what I show in the video, there are alternate setups shown later in this article.
Testimonials

“Last summer, I used the batting method you suggested and my pond has never been more clear! I’ve had my pond for over 8 years and used quite a few chemicals, helpful hints and gadgets, but this was the best, simplest and very inexpensive!! I will continue to use it. Thank you!!”
“I read your advice on using quilt batting to clean my pond. A thousand thank you is not enough.I have a 3000 gal. Pond and could not get it clean. I covered the filter with the batting and in 3 days was so clear I could see the bottom. I could not believe how fast it worked. At first I had to change the batting every 12 hrs or it would stop the water flow. You saved my fish. I am a grateful follower.”
Is this method safe for fish?
Yes, as far as I know, this method is safe for pond fish assuming you use the recommended quilt batting and do not veer from the instructions provided. It has been years since I first shared this method and since then I have never heard of any issues with fish. I would also never share this method if I thought it could harm fish in any way. Ultimately, I believe it benefits fish by offering clean, oxygenated water instead of murky, pea soup. But the disclaimer remains: try at your own risk as I cannot possibly anticipate your unique circumstances.
How to Clear Pond Water Fast Without Adding Chemicals
How It Works
Empress of Dirt Quilt Batting Clear Pond Method
If you understand the principle of this method, there are countless ways you could set it up.
- All we’re doing is running all of your pond water through synthetic quilt batting.
- Any loose algae and other floating gunk in the water will be trapped in the batting.
- When the batting is saturated with gunk, you replace it with a fresh piece and keep going. Some people wash out the batting and reuse it.
- Do not give up. If you are getting lots of gunk in the batting, it is working. It will take as long as it takes: it all depends on how big your pond is and how much gunk you have.
How to Make a Quilt Batting Pond Filter
Video Instructions
Watch the video to see one way to set up the batting. Then read the instructions (below) for more details.

As mentioned, this is just one way to set up the quilt batting. Other setups are shown below. So long as you come up with some way to run all the water through the batting, you are very likely to clear your pond water.
Photo & Written Instructions
The key ingredient is polyester quilt batting. Do not use cotton: it must be polyester and good quality. This stuff comes in flat sheets the size of a bed cover (often rolled up in a bag). It is not loose stuffing; it is all one piece.
I tested numerous other items including cotton quilt batting but nothing worked as well as the polyester. Any natural fabrics tended to clog too fast (straining the pump) and left remnants in the water (not good).
Quilt batting is traditionally used to make quilts and comforters poofy inside. But we will be using it to filter the pond water and collect up all the gunk that is making your pond green.

Here’s the quilt batting I use on Amazon.com. If you have Amazon Prime, just order one bag. You can always get more if you need it later. The amount needed will depend entirely on how much gunk you have. One sheet will be cut into pieces to provide several cleaning sessions.
Some readers ask about flame resistant products or the possibility of fire retardants in the product. Check product labels or manufacturer’s website if this is a concern for you.
What Type of Pump Should I Use?
The key to getting your water clear and keeping it that way is to have good circulation to help oxygenate the water.
I use basic recirculating pumps in my ponds. I have used several brands and do not have any particular one to recommend. They all seem to do a good job and last several years (year-round use).
Most of these pumps have a sponge-type filter inside that is removable and washable. Once you get a lot of algae, these sponges get clogged with gunk quite rapidly and that’s how the algae builds up: there isn’t anything to filter it out. And that’s how I thought of this idea to use quilt batting.
Some readers have replaced the sponge filter with the polyester batting. I do not recommend this simply because it could damage your pump and will likely need replacing so frequently you won’t be able to keep up with it.
If you can, do one of the methods listed below to make it more manageable.
Pump Shopping Tips

Choose a pump that is the right strength for your pond’s volume of water and allow extra power for any distances the pump has to ‘lift’ the water.
Example: A 600-gallon pond with a waterfall that sits 2-feet above the surface of the water.
- For a pond like this, you may need a pump that moves 750 gallons per hour (gph).
- If there was not a waterfall, a 600 gph recirculating pump should be fine.
- If a pump is too powerful, it can cause too much splashing (water loss) and noise.
This article on Advice for Starting a New Garden Pond has more information on choosing a pump.
Assemble Your Filter
There are many different ways to do this. Ultimately, you just need a way to a pass all the water through the batting without stressing your pond pump.
1Start With a Large Container
Start with some sort of container like a milk crate, wire waste basket, plastic basket, or anything else you can find that meets these criteria:
- strong
- waterproof
- larger than your pond pump
- holes in all sides to allow water flow
- acts as an open box around your pump
The purpose of this crate is to support the quilt batting while keeping it away from the pump. This will prevent stress on the pump.
After setting everything up, the crate is going to be placed underwater in your pond, either on a pond shelf or the bottom of your pond.
So long as your pump will not get damaged, do whatever works with the supplies you have on hand.

If you have a small size pump, this waste-basket setup also works.
2Insert Pond Pump in Container
Place the pond pump (this has to be a submersible, recirculating pump made for home garden ponds) in the crate. You need a hose attached to the pump to direct the output water to the outside of the crate.

3Wrap the Container in Quilt Batting
Next, wrap the outside of the crate in quilt batting.

In this example, I was working with smaller pieces of batting, but do use one large piece if you have it. It’s okay if there is some overlap where you fold it at the corners.
You want batting on every part of the crate where water can get through. I don’t wrap the bottom because it sits flush on the pond floor, but there’s not harm in having there too if it’s easier.

4Secure the Quilt Batting in Place
Once you submerge this in the pond, the water usually holds the batting in place. You can also add a bungee cord or some nylon rope to also secure it in place.

5Aim Water Output Hose Outside Container
Be sure to position the output water hose so that the filtered water will be sent outside the crate, back into the pond.

6Place Container in Pond Below Surface
That’s it for assembly. Now, submerge the entire thing in your pond. You can secure it in place with rocks or bricks as needed.
7Take Before Photos
Before you start the pump, take some photos and videos of the murky water. Then, turn on the pump and let the filter do its work.
8Check Water Flow
Start the pump and keep an eye on things to make sure everything is running fine.
Take photos every half hour or so, or whenever you start noticing an improvement.
The quilt batting will gradually turn green/brown as it collects up the gunk from the pond water.
So long as the pump is working fine without any reduced water flow, the batting is fine. When it becomes obviously saturated in gunk and/or the flow from the output hose is weaker, it’s time to change the batting.
How often this needs to happen depends entirely on your pond size, the amount of gunk, the strength of your pump, and the batting used—it could need changing a few times in the first few days or not.
Ready to Remove Dirty Batting?
When removing the dirty batting and crate from the pond, have a large tub or bin right beside it to set everything inside. This will prevent a bunch of gunky water from dripping back into the pond.
As mentioned, I find a small, 600-gallon pond with moderate murkiness can show improvement within an hour or two. Often the water is clear within 4 hours. I hope it’s the same for you.
I’ve had lots of emails from people with larger and/or murkier ponds and they say it can take days or even a week but it works. You have to stick with it, keep changing the batting as needed and eventually the water will clear (i.e. you will run out of algae!).
I’ve had just one person say they didn’t get results. My only guess is perhaps they had some type of algae or other growth that the batting could not collect.
9Admire Your Clear Pond Water

If you try this, I’d love to hear how it goes. And if you come up with a smart set up, let us know what you did. I came up with this method many years ago when we could not find a solution for my mom’s murky pond. It was pretty cool when, within a half hour of trying this, her pond finally started to clear and we could see the fish—and the bottom of the pond—again.
Alternative Setups
In-ground Skimmers
I have a second pond with a built-in, ground-level skimmer box. For that one, I sandwich a piece of polyester quilt batting between two baking cooling racks (held together with a couple of binder clips) and place it at the entry to the skimmer.
This filters any water going toward the pump located in the skimmer box.
Waterfalls
If you have a small waterfall, it is also possible to setup the quilt batting so that all of the water runs through it on its way back to the pond. I’ve done it by suspending the batting like a small hammock.
This will work if your pump is pulling water from the bottom of the pond, ensuring everything gets filtered.
Small Pumps
If you have a smaller pond pump, this setup can work. It doesn’t offer as much surface as the larger milk crate though so you may have to change the batting more often.
Use two wire mesh waste baskets from the dollar store. Sandwich batting between the baskets including the base. Place the pump inside and lower into pond so lip of baskets is just above water level. Aim water output hose to shoot water over top and back into pond.

It doesn’t offer as much filtering surface as the larger milk crate but works fine if your pump is small enough to fit inside.
There are more tips for using waste baskets in the garden here.
Maintenance and Prevention
You can continue using the Empress of Dirt Quilt Batting Method and change the batting as needed ongoing.
It is the fastest method but these can also help with ongoing maintenance:
- Barley straw is an excellent option for filtering the water on an ongoing basis. Barley has properties that inhibit the growth of algae. Do this after the batting method has cleared your water. To use it, put the bundled straw directly in the pond.
- Bio-balls are also very good for collecting pond gunk.
Frequently Asked Questions
How do you clean out a pond?
There’s usually two parts to this.
First, if your pond water is green and murky, there is likely excess algae. The Empress of Dirt quilt batting method shown above is very effective at removing the algae from many ponds.
The other problem is often gunk or debris or sludge on the bottom of the pond. This is some combination of decomposing organic materials including leaves, fish waste, and so on.
To me, this is not a problem at all but a sign that your pond is naturalizing and benefiting wildlife.
I’ve got so many fish and frogs living in my ponds that I no longer fret about this stuff and in fact welcome it. A gunky pond floor provides vital habitat for frogs in particular and they likely could not survive without it.
If you don’t have wildlife living in your pond, you can always drain it, clean out the bottom gunk, and refill it. I’ve seen some use wet-dry vac for this.
To prevent future issues, keep stuff like leaves out as much as you can.
Also, heat promotes algae growth so some shade over a pond is helpful.
Some people try leaf nets in fall, but I’ve never found they work as desired.
And you can always continue using the Empress of Dirt batting method to stay ahead of the algae.
How do I make my pond water clear naturally?
By “naturally” I’m assuming we mean without added pond chemicals intended for cleaning ponds.
First, do everything you can to prevent leaves and other natural materials from getting in your pond.
Next, get a good recirculating pump suitable for the size of pond and amount of water you are sending to any waterfalls or fountains.
Then, use barley straw, which is shown to prevent the growth of algae in backyard ponds.
Beneficial bacteria may also help.
If you do see the water going green, use the quilt batting filter method (above) to clear the water.
Resources


Reader Testimonials
Over the years I have received hundreds of testimonials about this quilt batting method for clearing pond water. I’m actually yet to receive something saying it does not work for anyone who follows the instructions.
“We tried this in our 1200 gallon pond, and the poly batting worked great! I cut pieces of batting to stick on the backside of our filter in the skimmer. Very easy! At first I was changing the batting every two hours, but eventually the water cleared up. Now I can see the bottom of the pond and all our fish again!” ~J.
Ruth sent these photos showing how much gunk the batting collected after just 45 minutes:

That’s a lot of muck out of the pond. Hers will take many batting changes before it’s clear. That’s why it’s important not to give up. You’ll get clear water if you allow it to do a thorough job for as long as it takes.
Di in Australia recently shared some photos from her pond. It’s 5×7 feet and 9 inches deep. Her pond was loaded with algae and she said it took 12 hours to clear it as shown below.
Here’s the pond BEFORE. The pictures are quite small but you can see the green water, some plants, and a hint of a fish below the mesh screen.


This next photo is a good example of what the batting looks like when it is saturated in algae. When the water flow shows any sign of slowing down, it’s time to change the batting. Depending on your situation, this could be hours, days, or months.
DURING
While there’s still some loose algae, now you can see the bottom of the pond and all of the fish. Di joked that they probably had no idea there were other fish in there with them.

AFTER
Di sent this next photo later, showing that the water continues to clear.
Once that algae is cleaned up, you can either keep using some to maintain the clear water, or switch to something like barley straw, which is also good for maintaining it.
Pond companies also recommend adding beneficial bacteria to the water.

Thanks for sharing these pictures, Di!
Victoria sent these photos with this note: “I found your idea on how to clear a murky dirty pond. We set it all up last Tuesday and changed the polyester 4 times and its now Monday the following week. It’s so clear now. We can see the bottom – about 4ft deep. It wonderful! Thanks for posting the wonderful idea!”
Before

After

Excellent results and happy fish!
If you’re new to this, be sure to take photos.
Good luck!
~Melissa the Empress of Dirt ♛